





Conquering Installation Anxiety Before the Crew Arrives
Your current air conditioner is failing, but you might be wondering exactly what to expect when we replace your entire HVAC system in one day. The dread of losing climate control during the peak cooling season is a heavy burden for any homeowner. You already know the house is going to get warm, but the uncertainty surrounding the mess, the noise, and the overall disruption to your daily routine can make scheduling the replacement feel overwhelming. It is completely normal to feel anxious about having a construction crew inside your living space, dismantling major appliances, and altering your home's infrastructure.
Here is the thing: a professional installation does not have to be a chaotic experience. By breaking down the process into a transparent, hour-by-hour timeline, you can see exactly how a structured team operates. Whether you are looking for comprehensive Heating Services or a full AC replacement in Virginia Beach, understanding the sequence of events empowers you to plan your day confidently.
During the intense summer heat, a home without air conditioning can see indoor temperatures rise ten to fifteen degrees in just a few hours. This creates immense urgency. A strict one-day turnaround is absolutely essential to prevent dangerous indoor temperatures and excessive humidity buildup. By knowing exactly when the power will be off and when the new system will fire up, you can safely navigate the day while our team handles the heavy lifting.
The Morning Arrival and Work Area Preparation
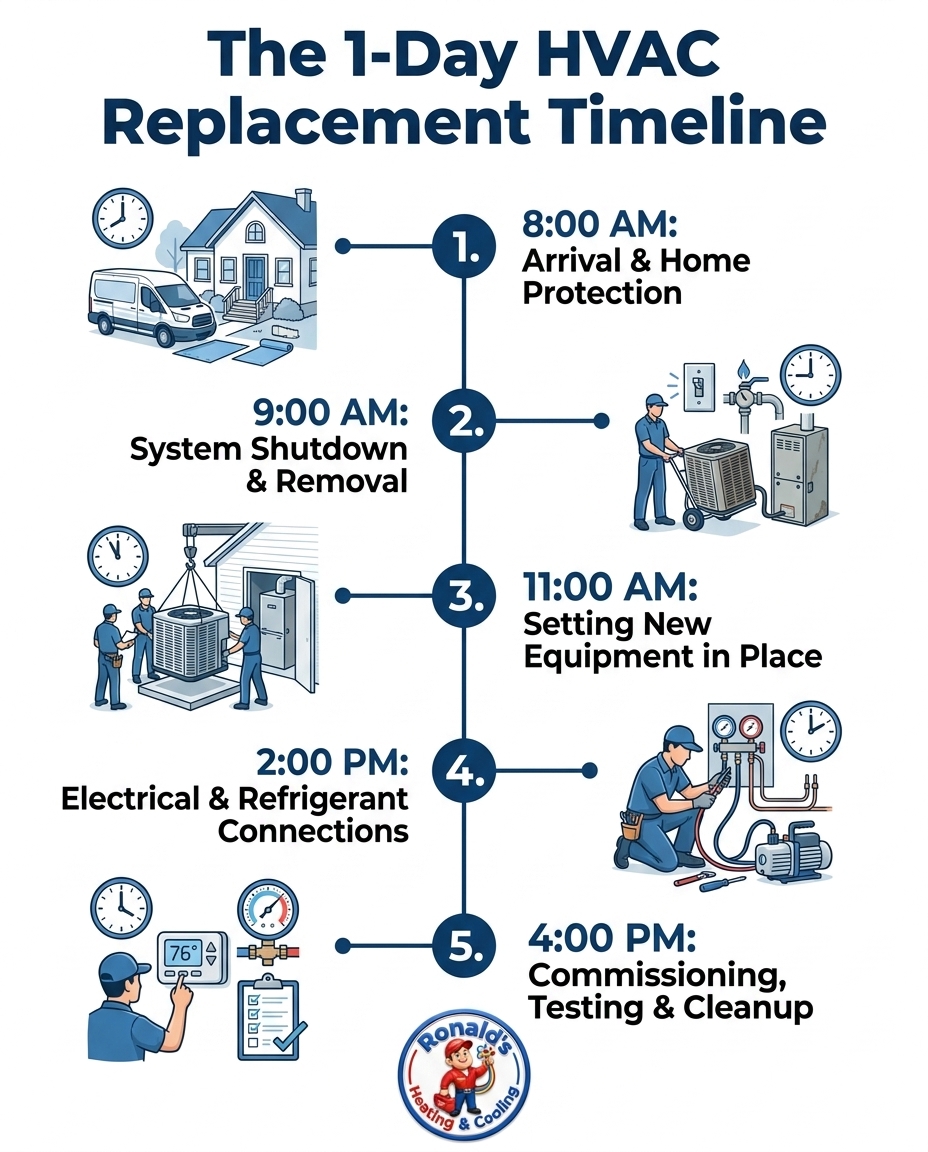
A seamless one-day turnaround begins long before a single tool is lifted. It starts with logistical efficiency and a deep respect for your property right from the start. A professional crew operates with military precision to ensure your home remains clean and undamaged throughout the heavy labor.
Here is the exact sequence you can expect during the first hour of installation day:
1. The courtesy call: Expect a phone call from the lead technician before the crew arrives. This confirms the timing, ensures you are ready, and allows the team to navigate morning traffic efficiently.
2. The initial walkthrough: Once on site, the lead technician will conduct a brief walkthrough of your home. They will verify the location of the indoor air handler, the outdoor condenser, the thermostat, and your electrical breaker panel. This ensures everyone is on the same page regarding the scope of work.
3. Interior property protection: Before bringing any heavy equipment inside, crews will lay down heavy-duty drop cloths, secure floor runners along the walking paths, and put on protective shoe covers. Protecting your hardwood, carpet, and tile is a mandatory first step.
4. Exterior staging: Tools, new equipment, and unboxing areas are set up outside the home. By staging the materials in the driveway or yard, the crew minimizes indoor clutter and keeps your living space clear of tripping hazards.
For homeowners in Virginia Beach, this structured morning routine means the disruption is contained immediately. You will know exactly where the technicians will be walking and working, allowing you to settle into a separate area of the house with peace of mind.
Safe Disconnection and Removal of Your Old System
Once the home is protected and the staging area is set, the physical work begins. The removal of your old equipment must be done methodically to ensure safety and prevent any damage to your home's existing ductwork or electrical infrastructure.
Power and Fuel Isolation
The very first technical step is isolating the system from its power sources. The crew will shut off the high-voltage electrical breakers that feed both the indoor and outdoor units. If your home utilizes natural gas or propane, the gas lines are safely shut off and disconnected from the existing furnace. This creates a completely safe, dead circuit for the technicians to work on. If you are also scheduling a furnace installation as part of a dual-fuel or complete system swap, handling these gas connections with strict adherence to safety codes is paramount.
Environmental Compliance and Recovery
Refrigerant recovery is one of the most critical parts of the morning. Technicians cannot simply cut the copper lines and let the old Freon or Puron escape into the atmosphere. Using specialized recovery machines and recovery tanks, the crew safely extracts the old refrigerant according to strict EPA regulations. This process takes time, but it is a legal and environmental necessity.
Dismantling and Extraction
With the system drained and unpowered, the old indoor air handler and outdoor condenser are dismantled. Careful extraction is required to navigate tight hallways, attic pull-down stairs, or narrow basement doors without scraping walls. Once the heavy, outdated units are removed and loaded onto the truck, the crew sweeps the empty work areas. Preparing a clean, blank canvas is essential before the new equipment is ever brought inside, especially during the peak cooling season when dust and debris can easily circulate through an open duct system.
Setting Up the New Equipment for Maximum Efficiency
By late morning, the transition from demolition to construction begins. This is the core installation phase where your new investment is put into place. Proper installation at this stage prevents future breakdowns and determines whether your new system will actually achieve its rated energy efficiency.
The installation phase generally follows these critical steps:
1. Preparing the outdoor foundation: The new outdoor condenser must sit perfectly level. Technicians will remove the old, sinking concrete or plastic pad and lay down a new, leveled composite pad. A level condenser ensures the internal compressor receives proper oil lubrication and operates quietly.
2. Positioning the indoor unit: The new air handler or furnace is maneuvered into place. Because modern systems are often taller or wider than units built twenty years ago, technicians will make necessary modifications to the sheet metal plenum. Custom-fitting this sheet metal ensures an airtight seal between the new unit and your existing ductwork.
3. Brazing the refrigerant lines: New copper refrigerant lines are fitted and brazed together using high-heat torches. To prevent oxidation and soot buildup inside the pipes during brazing, technicians flow a steady stream of nitrogen through the lines.
4. Pressure testing: Once the brazing is complete, the entire copper line set is pressurized with nitrogen to over 300 PSI. The crew monitors digital gauges to check for microscopic leaks. A system that holds pressure perfectly is a system that will not leak refrigerant down the road.
Proper sizing and meticulous installation of the new equipment is absolutely vital for handling extreme coastal humidity. If duct connections are loose or the unit is improperly leveled, the system will struggle to remove moisture from the air, leaving your home feeling clammy. One Virginia Beach homeowner recently experienced this exact process during a fall replacement. Their entire HVAC system was malfunctioning and failing to maintain a comfortable environment. Because the crew followed strict installation and sizing protocols, the entire system was replaced in a single day, operating flawlessly with no further issues.
System Commissioning and Electrical Testing
With the physical equipment set in place, the afternoon shifts to the highly technical phase of commissioning. This is the critical testing phase that ensures the system operates safely, efficiently, and according to manufacturer specifications before the crew ever packs up their tools.
The Deep Vacuum Process
Pulling a deep vacuum is a non-negotiable step. Technicians connect a heavy-duty vacuum pump to the sealed refrigerant lines to remove all atmospheric air and microscopic moisture. If moisture is left inside the copper pipes, it mixes with the new refrigerant oil to create a corrosive acid that will eventually destroy the compressor. The crew uses a digital micron gauge to verify that a perfect, dry vacuum has been achieved.
Charging and Electrical Verification
Once the vacuum is confirmed, the system is finally charged with fresh refrigerant. Electrical connections are finalized, tightened, and double-checked at both the indoor control board and the outdoor disconnect box. Loose wiring is a primary reason what makes your AC circuit breaker trip, so verifying these connections prevents nuisance outages later.
Performance Measurement
The system is powered on for the first time. The technicians do not just listen to see if it sounds good; they use digital tools to measure the actual performance. They measure the airflow volume, calculate the temperature drop across the indoor coil, and check the electrical amperage draws of the motors and compressor. Contrast this thorough testing phase with rushed contractors who simply turn the thermostat down and drive away. High expertise demands that every metric falls within the manufacturer's exact specifications before the job is considered complete, ensuring your home stays perfectly chilled through the peak cooling season.
The Final Walkthrough and Restoring Climate Control
As the late afternoon approaches, the intense labor concludes, and the focus shifts back to you, the homeowner. The final phase of a one-day installation is all about restoration, education, and cleanup.
Complete site cleanup is the first priority. All old equipment, scrap metal, copper cutoffs, and cardboard packaging are hauled away to the recycling center. The drop cloths are rolled up, and the work areas are meticulously swept or vacuumed, leaving your home spotless. You should never have to clean up after an installation crew.
The homeowner walkthrough is where you take control of your new comfort system. The lead technician will walk you through the new equipment, showing you exactly where the emergency shut-off switches are located and how to properly access and change the new air filters. They will also program your new thermostat, connect it to your home Wi-Fi if applicable, and teach you how to set your daily schedules.
Finally, there is the immediate relief of restored cooling. As the new system runs, you will feel the humidity drop and the crisp, clean air circulate through your home. During a recent summer replacement in Virginia Beach, a homeowner noted how critical this final phase is. The technicians arrived on time, maintained a professional workspace throughout the day, and ensured a quality installation that left the customer completely satisfied with their restored comfort.
Proactive Steps Homeowners Can Take Before Installation Day
While a professional crew handles the heavy lifting, the homeowner plays a crucial role in keeping the one-day timeline on track. By taking a few proactive steps the night before, you can help the installation begin smoothly and safely.
Here is a quick checklist of things you can do to prepare for the crew's arrival:
• Clear a wide, accessible path: Ensure there is a clear walkway from your driveway to the indoor unit location. Move bicycles, garden hoses, and patio furniture away from the outdoor condenser.
• Protect delicate items: Remove fragile wall hangings, picture frames, and small furniture located near the indoor work area or along the main hallways. The vibrations from removing heavy, old units can sometimes rattle interior walls.
• Secure your pets: Installation day involves open doors, loud noises, and unfamiliar people. Secure dogs and cats in a quiet, separate room or arrange for them to visit a pet daycare to keep them safe and stress-free.
• Plan for noise: If you work from home, expect a few hours of significant noise from power drills, metal cutting, and heavy footsteps. Consider working remotely from a local coffee shop or a quiet room on the opposite side of the house.
• Review your paperwork: Have your estimates and any paperwork regarding flexible HVAC financing options easily accessible in case you need to review terms with the lead technician before work begins.
By tackling these simple preparations, you ensure the crew can dive straight into their work, guaranteeing your home is back to peak comfort before the heat of the peak cooling season sets in for the evening.
Frequently Asked Questions
Can an entire HVAC system really be replaced in one day?
Yes, a standard residential HVAC system can typically be replaced in a single day. A professional crew of two to three technicians will arrive early in the morning and work methodically through a structured process. While complex custom ductwork modifications or unexpected electrical upgrades can extend the timeline, the vast majority of direct system swaps are completed within an 8- to 10-hour window.
How long does it take to replace a full HVAC system?
The average full system replacement takes between 8 and 14 hours of continuous work. The exact duration depends on the accessibility of your indoor unit (such as a tight attic versus an open basement) and the complexity of the new equipment. By late afternoon or early evening, the testing phase is usually complete and the system is fully operational.
Do I need to leave my house during the HVAC installation?
You do not need to leave your home during the installation process. Many homeowners prefer to stay in a separate room to be available for questions while avoiding the noise of the work areas. However, if you work from home and require absolute silence, you might find it more comfortable to relocate to a coffee shop for the middle portion of the day.
How messy is an HVAC replacement process?
A professional replacement should not leave a mess in your home. Expert technicians lay down drop cloths, use floor runners, and wear protective shoe covers to protect your interior surfaces. Once the installation is complete, the crew is responsible for hauling away all old equipment, sweeping the work areas, and leaving your home exactly as they found it.
How long will my home be without air conditioning during the swap?
Your home will be without active climate control for the entire duration of the installation, usually about 6 to 8 hours. Because the power must be disconnected and the old units removed entirely, there is no way to provide temporary cooling from the central system. We recommend keeping blinds closed and minimizing door openings to retain as much cool air as possible throughout the day.
What should I do with my pets while the HVAC crew is working?
It is best to secure your pets in a quiet, closed-off room away from the main work areas. Installation day involves loud power tools, heavy equipment being moved, and exterior doors frequently propped open. Keeping pets isolated ensures they remain safe from accidental escapes and reduces their anxiety from the ongoing construction noise.
